All Pro & DIY SAS kit - almost done.
Posted by: Anonymous
All Pro & DIY SAS kit - almost done. - 04/04/08 01:02 AM
Simply put, I'd like to know if anyone has used the All Pro Basic coil-over SAS kit on an X or pathy? If so, how did it go & how's it holding up?
I've been reading up on the Coil-over SAS & Leaf SAS process for the 1st Gen's and it seems like the All Pro coil over kit is complete, well designed, and inexpensive. Any thoughts? Xtoolbox was the one who originally recommended the idea to me on the SCCX site and I also saw his recommendation in this section too.
All Pro basic SAS coil-over kit Don't get me wrong, the Calmini kit seems great and I know a lot of you are running it. The only reason I'm considering the All Pro kit is because it fairly complete and less expensive. Plus, I'd like to spend some more time welding.
So, let's here what you've got to say.
Posted by: Xtoolbox
Re: All Pro & DIY SAS kit - almost done. - 06/04/08 08:59 AM
Posted by: Anonymous
Re: All Pro & DIY SAS kit - almost done. - 12/04/08 10:20 AM
Sooo, what would it take to get this system on an X?
I don't know how to weld, or even what half of that crap is, but I'm sitting out here in the desert banking, not to mention I got promoted in Jan, and I just re-enlisted and got a PHAT bonus.
So please, we talking some MAJOR fab work at a local shop or some $$$ to a local XOC member or is it a lost cause and should I just look into getting the Calmini cause it's mostly bolt on?
![[drink]](graemlins/drink.gif)
<--- I wish
Posted by: Anonymous
Re: All Pro & DIY SAS kit - almost done. - 12/04/08 12:55 PM
Well it looks like more welding for sure. A quck read through seems like they were having some clearance issues with an upper link.
SteevO needs to post more pictures up even after looking through the kit pictures would help alot. That year of pathfinder is not all that different from an X.
Posted by: Anonymous
Re: All Pro & DIY SAS kit - almost done. - 12/04/08 01:02 PM
OK a few more observations the upper link on the diff was bent to clear the frame.
In order to clear the axle links you will need to fab a new Tcase Crossmember from scratch.
I cant tell how high tose links go during flex but it may hit the exhast on the drivers side.
Posted by: Anonymous
Re: All Pro & DIY SAS kit - almost done. - 12/04/08 01:07 PM
Another quick note.. the kit looks to be designed for a high pinon axle
![[ThumbsUp]](graemlins/thumbsup.gif)
. Little bit harder to find but they are out there.
Posted by: Anonymous
Re: All Pro & DIY SAS kit - almost done. - 14/04/08 09:40 PM
Well, I bought the kit so I'll let you guys know how it goes. It's looks like it going to take a lot of fab work. The upper shock mounts are going to be tough as well.
Posted by: Anonymous
Re: All Pro & DIY SAS kit - almost done. - 14/04/08 10:47 PM
Hey Guys,
Just wanted to drop by and tell you guys about the build a little bit.
Yeah the kit was originally made for a HP Axle and the front drive shafts starts to bind up just a little at full droop. but i'll be modifying the bracket/truss for the upper link to kick the pinion up and also push the axle forward a little. Whatever i come up with i'm going to do what i can to get them made eventually working towards a full SAS Kit.
Why All-Pro makes the bracket for the wagoneer D44 Low pinion axle is still a mystery to me.
The front driveshaft pinion or any other parts do not hit the exhaust.
My next post will be full of pics for you guys.
feel free to ask any other questions and don't be affraid to also contribute to the Rugged Rocks Board.
Posted by: Anonymous
Re: All Pro & DIY SAS kit - almost done. - 14/04/08 11:19 PM
Posted by: Anonymous
Re: All Pro & DIY SAS kit - almost done. - 14/04/08 11:48 PM
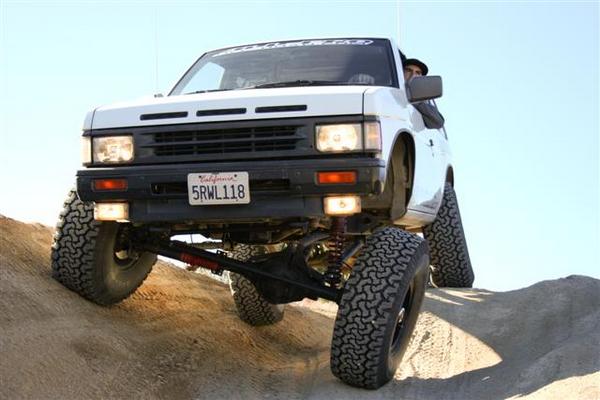
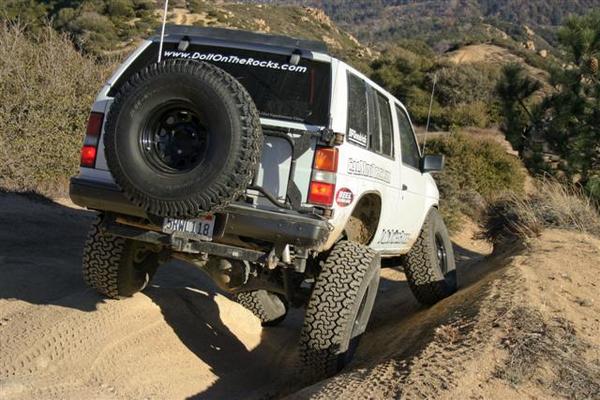
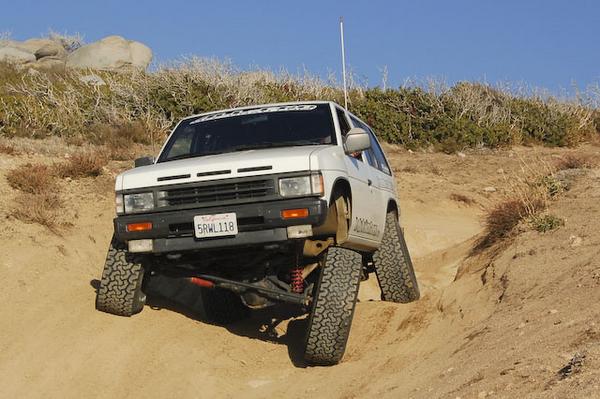
and of course there are the pics of the build here:
Nissan Pathfinder Solid Axle Swap - 4WD&SU and just to get your wheels turning i'm working on the atlas t-case adapter that shuld also fit the 1st gen X's. i should have the first one installed in a few weeks.
Posted by: Anonymous
Re: All Pro & DIY SAS kit - almost done. - 16/04/08 09:43 AM
Thanks for posting up the pics SteeevO.
Now I've got to figure out how I'm going to fab up a new cross member.
SteeevO - would you have been able to leave the stock exhaust and get everything to fit?
Posted by: Anonymous
Re: All Pro & DIY SAS kit - almost done. - 16/04/08 02:24 PM
You will need to modify the exhaust. usualy people just modify the Y-pipe but i just had the entire thing ran new since i needed a new cat,muffler and i installed new headers.
and no prob on the pics.
Posted by: Anonymous
Re: All Pro & DIY SAS kit - almost done. - 07/05/08 10:19 AM
any update on this?
Posted by: Anonymous
Re: All Pro & DIY SAS kit - almost done. - 07/05/08 10:28 AM
Yeah, still waiting on a parts to be shipped... Nissan Nut's Driveshaft adapter from Grassroots4x4. It's taking a bit of time
I've still got a bit of Axle prep to finish too.
Quick question SteeevO - why did you go with the weld-on tube shock hangers? Did it have anything to do with steering box getting in the way of the regular shock hangers?
Posted by: Anonymous
Re: All Pro & DIY SAS kit - almost done. - 08/05/08 11:08 PM
ah, what DS are you using?
and i used the hoops becuase they allow for more uptravel and the tacoma buckets are at the wrong angle for the pathfinders fenders. i would have had to reroute LOTS of lines and cut ALOT of fender out.
Posted by: Anonymous
Re: All Pro & DIY SAS kit - almost done. - 09/05/08 02:03 PM
Ok, I need a little help here. What's DS stand for?
I'm now thinking it would have been a good idea to use the same type of shock hoops you've got because, like you said, the angle is off and I'm going to need to do a bit of fabricating to get it to fit without interfering with the steering box and linkage.
Posted by: Anonymous
Re: All Pro & DIY SAS kit - almost done. - 13/05/08 09:27 PM
Sorry for the delayed response i thought i had e-mail notifications on,& i don't monitor this forum as often as the rugged rocks one...

also sorry for the confusion.. on DS, i meant front Drive Shaft.
and the hoops would probably work out better.
You have any pics yet?

Posted by: Anonymous
Re: All Pro & DIY SAS kit - almost done. - 14/05/08 10:13 AM
Hey SteeevO,
No pics yet. just a big pile of parts right now. I'll be using the a shortened XJ driveshaft with the CV adapter from grassroots4x4.
The hoops look like the most simple way to go. For now I'm going to try and prefab in the shock towers that came with the kit. I'm pretty sure I can get it to fit in there without causing any problems. I'll shoot out another update soon.
Posted by: Anonymous
Re: All Pro & DIY SAS kit - almost done. - 27/05/08 04:29 PM
I came from a tacoma club and everyone that has tried that kit has had a ton of trouble. After a ton of fab work and headache they got it to work well though
Posted by: Anonymous
Re: All Pro & DIY SAS kit - almost done. - 02/06/08 02:48 PM
Originally posted by Morton58:
I came from a tacoma club and everyone that has tried that kit has had a ton of trouble. After a ton of fab work and headache they got it to work well though
Tell you what!!!! Wow, this is taking a ton of work... Still waiting on the last few parts... more updates coming in the next week or two.
Posted by: Anonymous
Re: All Pro & DIY SAS kit - almost done. - 04/07/08 01:45 AM
... Took a whole lot more work than expected... Things got a bit sketchy during the first couple test drives. Almost had a disaster. Bump steer is weird!
had the break through tonight and got to test it out a bit... This thing is absolutely amazing!!! More details and pics to come...
Posted by: Anonymous
Re: All Pro & DIY SAS kit - almost done. - 08/07/08 11:54 AM
Posted by: Anonymous
Re: All Pro & DIY SAS kit - almost done. - 08/07/08 11:57 AM
Got a question for all of you SAS'd guys....
How's the braking with the SAS'd axle? Was it harder or softer than the stock IFS? Did you swap out the master cylinder with another master cylinder to get more braking power?
Posted by: Anonymous
Re: All Pro & DIY SAS kit - almost done. - 08/07/08 02:42 PM
Mine was softer and the pedal does push in further. Its due to the fact the waggy axle brakes are one HUGE piston and the IFS brakes are 2 much smaller pistons right over the pads. So the waggy axle takes a bit more fluid to get it done.
I know a few guys have fabbed in to fit a Chevy Master Cylinder and it works really well.
Im not gonna do it because I got my X to stop on the steepest part of Lions Back (when it was open).
Posted by: Anonymous
Re: All Pro & DIY SAS kit - almost done. - 08/07/08 03:55 PM
Originally posted by Alpine Spirit:
Mine was softer and the pedal does push in further. Its due to the fact the waggy axle brakes are one HUGE piston and the IFS brakes are 2 much smaller pistons right over the pads. So the waggy axle takes a bit more fluid to get it done.
I know a few guys have fabbed in to fit a Chevy Master Cylinder and it works really well.
Im not gonna do it because I got my X to stop on the steepest part of Lions Back (when it was open).
My only thing is that I feel like I've got about 80-85% of my original braking power. I can't get the X to lock up but it does stop fairly quickly.
Where your friends who fabbed the Chevy Master Cylinder doing it for an Xterra? If so, got any links or site you'd be willing to pass along with info?
My thought was actually to try and fit a master cylinder out of a Titan or Armada. I'm going to head down to the dealership and see if I can do a side by side comparison.
Posted by: Anonymous
Re: All Pro & DIY SAS kit - almost done. - 08/07/08 04:18 PM
The Axle looks pivoted way far backwards.
Hows the driveshaft going to be?
Posted by: Anonymous
Re: All Pro & DIY SAS kit - almost done. - 08/07/08 04:32 PM
Originally posted by Boondox:
The Axle looks pivoted way far backwards.
Hows the driveshaft going to be?
The Pinon is at a 0 degree angle (completely flat). The drive shaft is going to have a U-joint connecting to the pinion and a CV joint connecting to transfer case.
I am have some alignment issues but that's why paid for lifetime alignment at Firestone after the SAS.
Posted by: FSRBIKER
Re: All Pro & DIY SAS kit - almost done. - 09/07/08 05:16 AM
Why would you set the pinion angle at 0 degrees? I can forsee nothing but problems with this, I hope it works out for you though.
Originally posted by Onewaysoldier:
Originally posted by Boondox:
[b]The Axle looks pivoted way far backwards.
Hows the driveshaft going to be?
I am have some alignment issues but that's why paid for lifetime alignment at Firestone after the SAS.[/b]
Posted by: Anonymous
Re: All Pro & DIY SAS kit - almost done. - 09/07/08 09:48 AM
Originally posted by FSRBIKER:
Why would you set the pinion angle at 0 degrees? I can forsee nothing but problems with this, I hope it works out for you though.
Originally posted by Onewaysoldier:
[b]
Originally posted by Boondox:
[b]The Axle looks pivoted way far backwards.
Hows the driveshaft going to be?
The Pinon is at a 0 degree angle (completely flat). The drive shaft is going to have a U-joint connecting to the pinion and a CV joint connecting to transfer case.
I am have some alignment issues but that's why paid for lifetime alignment at Firestone after the SAS.[/b]
I'm all ears... How could this cause problems? I don't claim to be an expert at this stuff. I've been researching as I go.
The reason I think the angle is set at 0 is because I used the old leaf spring plates to level out the axle when fabbing up the brackets and shock mounts. My thought was if I wanted to keep the same camber and caster that were used on the original Wagoneer I would need to make sure the axle was positioned under the X as it was under the Wagoneer. Since the spring plates on the axle were parallel to the ground I used them as a reference point and assumed the pinion was at a 0 degree angle from there. But, the pinion angle is whatever it was on the Wagoneer. Does that make sense?
Posted by: Anonymous
Re: All Pro & DIY SAS kit - almost done. - 09/07/08 12:02 PM
Pinion angle is the difference between the centerline of the driveshaft and the centerline of the pinion shaft of the differential. To measure it you must be able to work under the car with the suspension fully loaded and the car level. A drive on lift works best for this.
Use an angle measuring gauge (adjustable protractor) to measure the difference between the pinion flange and the drive shaft directly. These gauges are available for under $10 from a hardware store. Place the edge of the gauge vertically against the front of the pinion flange, beside the driveshaft. Extend the measuring arm forward parallel to the bottom of the driveshaft. Extend a straight edge under the driveshaft to the measuring arm of the angle gauge. Hold the straight edge flat against the bottom of the driveshaft and adjust the measuring arm to read the angle. Depending on the gauge you use, you may have to subtract 90° from your reading to get the correct number. Your final measurement should be between 0 and 5.
For how high your truck is sitting you'd have to drop your transfer case 8" to make that driveshaft line up. You're better off repositioning the front suspension....in the long run it'll save you.
Posted by: Anonymous
Re: All Pro & DIY SAS kit - almost done. - 09/07/08 05:37 PM
Just run it. See how it does.
In order to change the angle you will have too cut the brackets for your suspension and cut the outer Cs, then turn the pinon and reweld everything. That is the only way to keep the steering and alignment in tact.
Alignment issues I am assuming you mean your tires are slightly like this \---/ they make spacers for that that go on the outside of the knuckle to correct the angle.
Also as an FYI if you point the pinon right at the tcase you will get a vibration UNLESS you run a CV at the Tcase.

NissanClay used a Chevy master Cylinder for his brakes and said he had to trim the portion on the firewall below the stock Master to make it fit.
Ask him over on RoninWheelers.com he rarely if every shows up here.
Posted by: Anonymous
Re: All Pro & DIY SAS kit - almost done. - 10/07/08 08:02 AM
Looks nice! SO from start to finish what was the total cost? I will need to replace my from end soon so a sas is in mind.
Posted by: FSRBIKER
Re: All Pro & DIY SAS kit - almost done. - 10/07/08 09:16 AM
Just to clarify I applaud you taking on the project and going in a different direction than using a Calmini kit, whether that was for saving money or other reasons. I understand what you are saying with the Wagoneer axle but unless you compared it's location to that of it's transfer case output and mimmicked this exactly in the Xterra then you might have issues.
If you read some of the replies since I posted I think you get some more ideas on what I was leading to. Fabricating a one off setup is trial and error, but that can be some of the fun of it and when you get your truck dialed in you will be proud at what you accomplished. Now I am trying to remember but doesn't the Calmini kit require you to cut and rotate the knuckles? This is probably your solution as well, a well designed driveshaft is also needed but you might not want to compensate for something you can adjust somewhere else. Keep up the progress and posting of pictures, everyone here learns and gives advice which makes everyones trucks better.
Posted by: Anonymous
Re: All Pro & DIY SAS kit - almost done. - 10/07/08 12:29 PM
Alpine -
Thanks for the info on NissanClay & Ronin wheelers. Registered over there and may ask a few questions. I read up on his build the the challenges his went through with braking and I'm going to see if I can't adjust it a bit more before going with a Chebby MC. But, if it still don't have the braking power necessary... Then it's time to do a bit more retrofitting and fabbing to get a bigger MC in place.
http://www.roninwheelers.com/vbullet...?t=1137&page=6 I'm going to be using a shortened XJ driveshaft (CV at the transfercase) along with NissanNut's CV shaft adapter. Nissan Nut has a good write up on how to do this on his site.
FSRBIKER -
Thanks for the encouragement. I'm sure once this is done and I get a chance to test this out on the trail I'll be pretty stoked. This is by far the biggest project I've every attempted and I'm learning a lot.
I'm about 95% certain that the Calmini kit doesn't require the the Knuckles be cut and rotated. SteeevO mounted his the same way and I've not heard anything from him yet about it giving him issues. Not to discount what you're saying. I can see how it could cause the u-joints to wear out prematurely and possibly bind at full droop. I'm thinking I'll give it go and see how things hold up on the trail.
Oh yeah, my original plan to do this all in one weekend... Absolutely crazy! Maybe to a team of guys who've done this a bunch of times. But custom fitting and fabbing a kit like this takes time if you're going to do it right and make it safe. Lesson learned... Take time and do it right, safe, & once... Fixing things that have been fabbed poorly is more expensive than doing it right the first time.
Posted by: Anonymous
Re: All Pro & DIY SAS kit - almost done. - 10/07/08 02:41 PM
You don't have to cut and turn the C's with the Calmini kit.
Not that its a huge deal, but you might also want to double check your exhaust clearance. On Rachel's (w/the Calmini kit, tho), the front DS has done a nice job of buzz sawing the cat converter for clearance.
Posted by: Anonymous
Re: All Pro & DIY SAS kit - almost done. - 10/07/08 03:01 PM
Originally posted by Bobby B.:
You don't have to cut and turn the C's with the Calmini kit.
Not that its a huge deal, but you might also want to double check your exhaust clearance. On Rachel's (w/the Calmini kit, tho), the front DS has done a nice job of buzz sawing the cat converter for clearance.
That's what I was thinking. Apparently the Pinion is at a 10 degree angle on the Waggys. I'm going to try and double check that still. But I think I should be ok with a CV DS.
Yeah, I'm going to need to put in a custom exhaust system after the exhaust manifold on the driver's side to allow the 3rd and DS to stuff proper w/o hitting the cayts. Right now it's obnoxiously loud when I take it for test drives.
Posted by: Powerguy38
Re: All Pro & DIY SAS kit - almost done. - 10/07/08 05:49 PM
I'm going to be using a shortened XJ driveshaft (CV at the transfercase) along with NissanNut's CV shaft adapter. Nissan Nut has a good write up on how to do this on his site.
That's what I'm using on mine.
I guess I got lucky on my exhaust. The cat is not in the way.
Posted by: Anonymous
Re: All Pro & DIY SAS kit - almost done. - 11/07/08 08:28 AM
Originally posted by Powerguy38:
I'm going to be using a shortened XJ driveshaft (CV at the transfercase) along with NissanNut's CV shaft adapter. Nissan Nut has a good write up on how to do this on his site.
I guess I got lucky on my exhaust. The cat is not in the way.Are you running the Calmini Kit? If so, then that makes sense.
The All-Pro kit is a three link. The third link connecting to the top of the dif which stuff up between the oil pan and engine mount and would hit the 2nd cayt under stuffage.
Posted by: Anonymous
Re: All Pro & DIY SAS kit - almost done. - 11/07/08 08:59 AM
Originally posted by wanderinwoods:
Looks nice! SO from start to finish what was the total cost? I will need to replace my from end soon so a sas is in mind.
I've got a pretty detailed write up I'm putting together for this build. But I'm going to wait on posting it until i get everything finished.
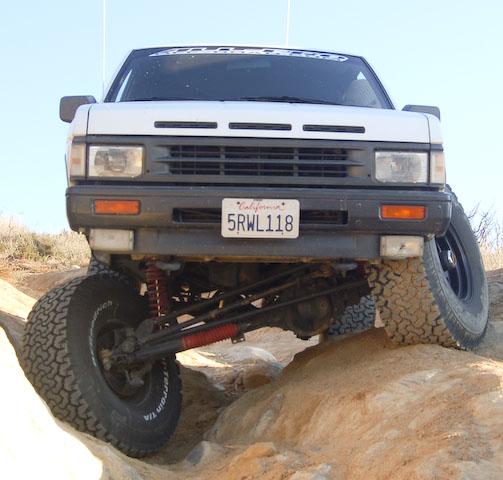
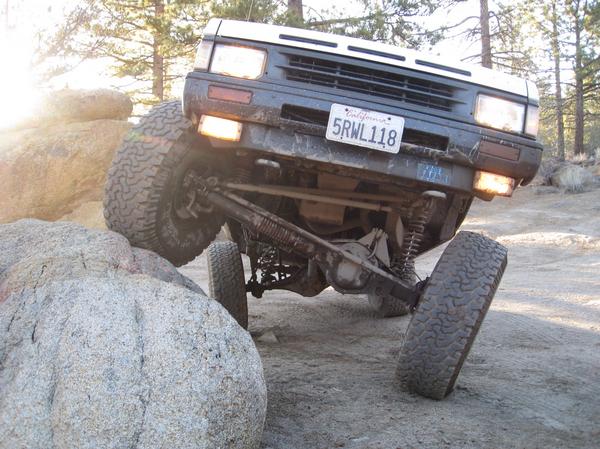
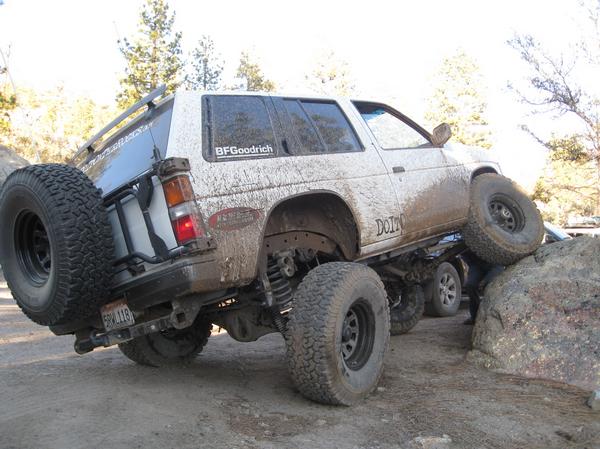
The total cost is far less than the Calmini kit. I'm thinking, minus the gears/brakes/steering, the raw suspension (including coil-overs) and link system would only cost about about $2100 - $2300. But, there is one bracket and crossmember that you'll need to fab up on your own. It's technical build and will require your X to stay on jack stands for at least three or four days. I've been up on blocks for about two weeks now.
Posted by: Powerguy38
Re: All Pro & DIY SAS kit - almost done. - 11/07/08 06:26 PM
Are you running the Calmini Kit? If so, then that makes sense.
The All-Pro kit is a three link. The third link connecting to the top of the dif which stuff up between the oil pan and engine mount and would hit the 2nd cayt under stuffage.
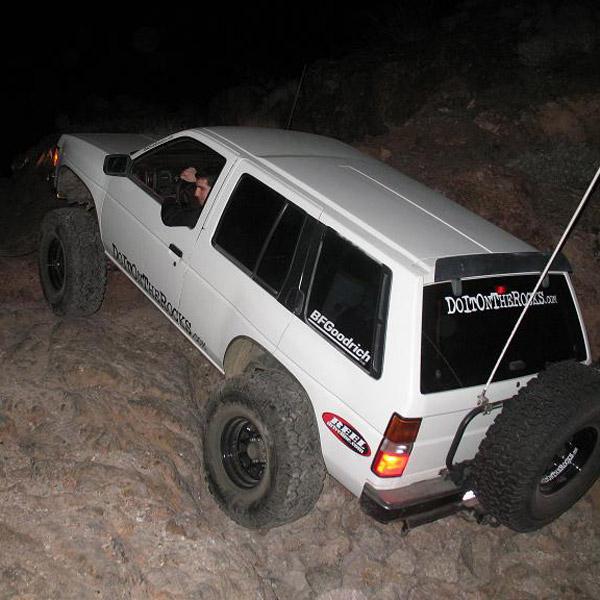
No, I'm running SUA with Rancho Waggy lift springs. It's pretty much just built from a bunch of gathered parts after getting lots of info from lots of people. 95% of the build was done in a weekend. We started at 8:00am on Saturday and I drove it home about 9:00pm Sunday. It was one scary ass ride home.
![[Uh Oh !]](graemlins/uhoh.gif)
Since the initial build, we fabbed up the drive shaft, added a sway bar with JKS disconnects, and retooled the front shackles. The only thing left is to get the custom skid plates on this weekend so I can be ready for ECXC.


Posted by: Anonymous
Re: All Pro & DIY SAS kit - almost done. - 12/07/08 08:40 AM
Originally posted by Onewaysoldier:
Originally posted by wanderinwoods:
[b]Looks nice! SO from start to finish what was the total cost? I will need to replace my from end soon so a sas is in mind.
The total cost is far less than the Calmini kit. I'm thinking, minus the gears/brakes/steering, the raw suspension (including coil-overs) and link system would only cost about about $2100 - $2300. But, there is one bracket and crossmember that you'll need to fab up on your own. It's technical build and will require your X to stay on jack stands for at least three or four days. I've been up on blocks for about two weeks now.[/b]Nice setup. I can't wait to see the write up and some trail pics. Good work!
![[ThumbsUp]](graemlins/thumbsup.gif)
![[drink]](graemlins/drink.gif) <--- I wish
<--- I wish
![[ThumbsUp]](graemlins/thumbsup.gif) . Little bit harder to find but they are out there.
. Little bit harder to find but they are out there.




![[Uh Oh !]](graemlins/uhoh.gif)

