| CALMINI Performance Exhaust System |
| Overview - Installation - Testing - Conclusion | |||
| Overview | |||
|
CALMINI has been building accessories
and components for Isuzu and Suzuki vehicles for 15 years, and are
well known in the industry for innovation and quality. Now that
they've seen the cult following the Xterra has generated, they've
got on board with a selection of high quality aftermarket parts
designed specifically for it. CALMINI's first performance product for the Xterra is their high-flow Performance Exhaust System. This cat-back system is built from 2.25" OD 16 ga. aluminized steel, and is easy to install. The CALMINI Performance Exhaust System kit includes:
For more information about this product visit CALMINI |
|||
| Installation | |||
|
Installation can be handled by yourself in about an hour with adequate tools. Full instructions are included with the kit. |
|||
|
|
||
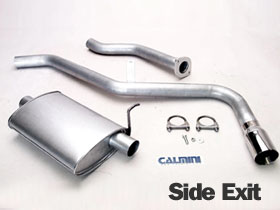
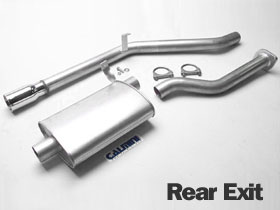
| CALMINI offers 2 styles of their exhaust system, both a side exit model... |
...and a rear exit model. We installed, and are reviewing the rear exit model. |
||
|
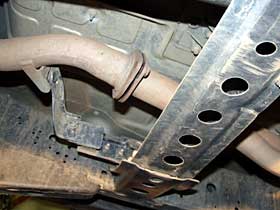
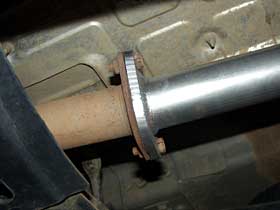
Installation begins by removing the existing exhaust tubing and muffler from the catalytic converter flange back. Dropping the spare tire out of the way will give you more room to work, and is recommended. Two bolts hold the rear exhaust section to the flange just behind the y-pipe junction. Loosen and remove the 2 bolts (you may need to use a penetrator like Liquid Wrench or WD-40 if the bolts are stubborn). There is a metal gasket between the two sections of the pipes, this will be reused when installing the CALMINI pipe, so don't lose it. |
|
||
|
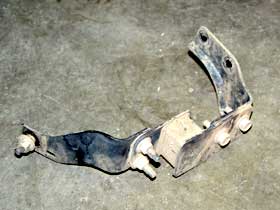
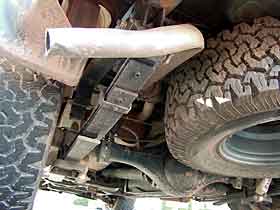
Just aft of the flange is this stock front hanger, which will not be used with the CALMINI exhaust. Remove two bolts from the crossmember, and one bolt from the exhaust tubing to remove it. At this point, you may want to support the stock exhaust. It's a bit heavy, and can move around a lot while removing the remaining hardware. I used several bungee cords to support the tubing sections. The stock muffler has a pin that mounts to a rubber grommet. With some WD-40 and a few taps with a plastic mallet, the pin slid out of the grommet. Aft of the muffler, unbolt the rear hanger from the frame. |
||
|
With everything unhooked, lower the stock exhaust and pull it out toward the rear of the vehicle. It's all one piece, so it takes some work to get it over the rear axle and out. The CALMINI exhaust is 3 pieces, so installation is much easier than removal of the stock exhaust. The front pipe bolts back up to the flange with the stock bolts. Make sure you put the gasket back in place, and tighten the bolts. |
|
||
|
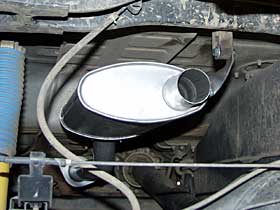
Once in place, slide the u-bolt clamp over the front tubing, it will clamp the muffler in place. |
||
|
Slide the front of the muffler into the front tubing. Finger tighten the u-bolt clamp around the tubing to hold the muffler in place. The rear of the muffler attaches to the rubber hanger grommet with a bolt instead of the stock pin. Hold the muffler in place, push the bolt through the hanger, put the washer on and tighten down the nut.
|
|
||
|
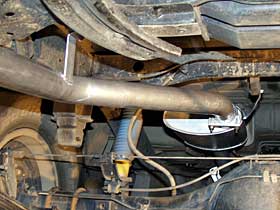
Mount the rear tubing up in a similar fashion. Place the other u-bolt clamp around the rear tube, then slide the tubing into the rear of the muffler. Hand tighten the u-bolt clamp. Use the existing 10mm bolt to attach the rear hanger to the frame mount. Once everything is in place you can tighten down the bolts. Make sure the rear exhaust tubing is running parallel to the frame. |
||
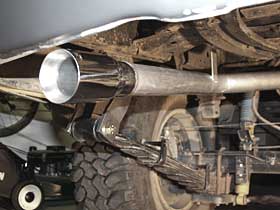
|
With the rear exit design, the stainless steel tip should stop just inside the rear bumper. If not, adjust it by pushing the tubing forward a bit into the muffler, and retightening the u-bolt clamp. |
|
||
| Testing | |||
| Testing has been ongoing since I installed the CALMINI Exhaust in September, prior to GOX. | |||
|
Performance Can I feel the difference ? It's hard to tell. Even if the exhaust put out an extra 10 HP, it would be very hard to feel it in the seat of the pants. My Xterra has 32 inch tires, and 500 extra pounds of gear in it, so trying to estimate if there is more performance in my Xterra is difficult. Mileage hasn't changed much one way or another as far as I can tell. My mileage is all over the board, from a low of 9 MPG when in 4Lo, to 21 MPG on the highway for extended periods.
|
|
||
|
Off-road however, I have noticed a change. Many obstacles I've driven in the past in 1st-Lo, can be driven in 2nd-Lo. Being able to hear the RPM's better through the exhausts nice mellow rumble has made driving off-road a lot easier. I can tell when the Rpm's are dropping quickly, and get back on the throttle if needed. Below 1500 RPM, the Xterra always felt like it wanted to stall. With the CALMINI exhaust, I can take the RPMs down to 500, and still keep the engine alive to power over the next obstacle. |
||
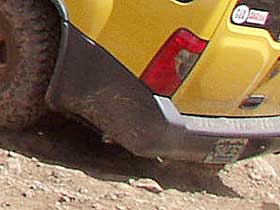
|
Does it Mosi ? Marc Mosiman was the first person to officially waste a stock exhaust pipe by dragging it over an obstacle. Since then, pinching off, or otherwise mangling an exhaust has been know as a "Mosi'd tailpipe". That's my stock pipe on the right after backing off an obstacle in Moab last year. The stainless tip on the CALMINI exhaust has held up well to abuse. It has been dragged hard over several obstacles, and has yet to be deformed. Some people (including myself) were worried about a rear exit pipe, but so far, it hasn't been an issue. If you're still worried about it, CALMINI offers a side exit pipe as well. |
|
||
| Conclusion | |||
|
For the price, the CALMINI exhaust is hard to beat. The installation was easy, the sound is just right, and performance does seem to be increased somewhat. If your stock exhaust is beaten beyond recognition, this exhaust would be a good replacement for it. Now that the backend of the engine has been opened up, I'm looking forward to increase the intake side of things. Together, they may make the Xterra even more drivable, both on- and off-road. |
|||
| Review by xoc December 21, 2001 | |||