|
0 registered (),
139
Guests and
0
Spiders online. |
|
Key:
Admin,
Global Mod,
Mod
|
|
|
#291422 - 29/08/06 10:37 AM
 Idea for a roof rack light bar
|
Anonymous
Unregistered
|
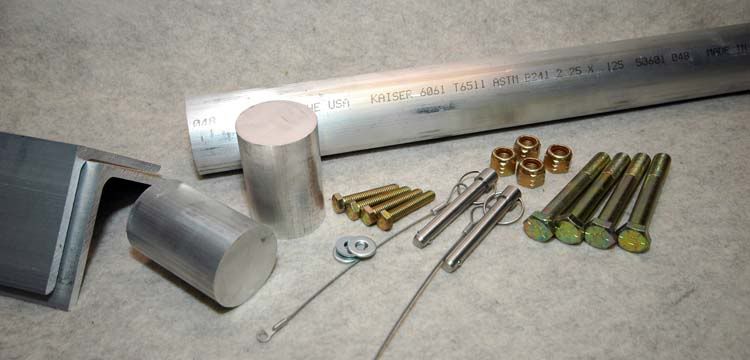
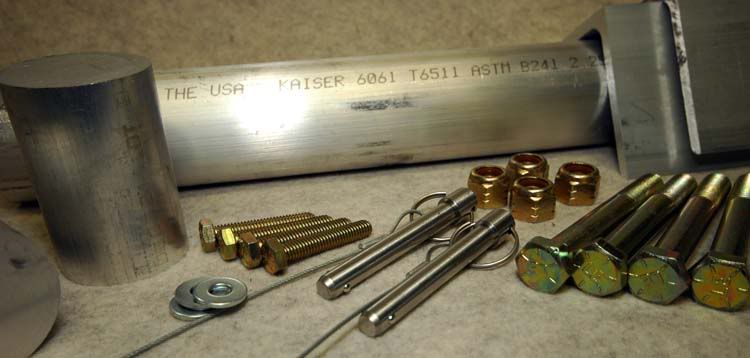
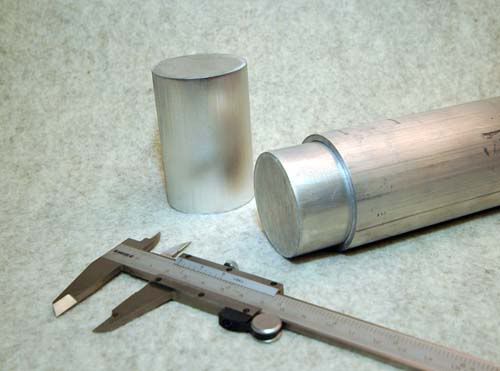
I've just purchased an Xterra and want to mount a light bar where the roof storage would go. I've found that if I were to mount a set of KC HiliTES up there on a straight piece of alumimum track that I would have just about a half of an inch of clearance before hitting my garage. That's really too close for comfort and I would like to be able to put at least a 2" lift kit on - so I need to lower the lights 2" or go with smaller lights. Size matters and I like big lights so going with a 4" light would mean likely having to drop down to 55w bulbs (whimpy!). I looked around the dealers and found a few light bars but they all look like they stick up too high to fit my garage. I'm also a ham radio operator and need a mounting for a nice size 2M or 440 stick ... the middle of the roof is the best location for antennas. So I'm pretty handy with metal working but I am not a machinist by any measure. I'm better than most but not as good as some with tools. I put my mind to a roof rack mounted lighting bar that would be mounted lower than the mounting points for the roof storage, could be made with common power tools (no CNC or TIG welding), and could fold over to allow enterance into a garage. Here's what I came up with - total parts are going to be about $100 which includes mounting screws and a can of black spray paint. 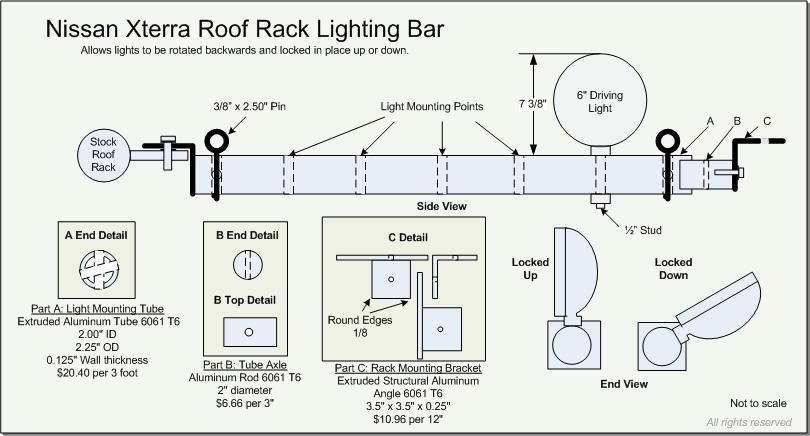 I thought about angling the lights downwards rather than putting them at 90 degrees straight back to avoid collecting water on the lens but a closer examination of the design of the KC's makes me think that straight back would be fine as long as the whip ham antenna has enough flex to bend on the next bar back.  So the end is a solid piece of 2" T6 aluminum with a mounting drilled and tapped for a 1/2" mounting bolt. That's going to be the toughest part of the whole project but I already have taps that size laying around. There is one hole drilled straight up and down into which a retaining pin slides into - these guys are sold at Home Depot. I figure I could subsitute a bolt and a wing nut if the retaining pin lets the lights wiggle too much while off road. Using 0.25" T6 thick tube means that this thing is going to be pretty beefy but the tube weighs in at just a bit less than 7 pounds.  The "L" bracket on the side is 10 inches long meaning it can hit both of the stock roof storages mounting bolts. I'll put a third one in there in the middle and come through with a nice machine bolt and a bottom backing plate a few inches long to spread the stress load out across the bottom. If I wanted to get lower I could as there is about 4" of dip down below the very front air dam on the '06 model but then the lights would point into the air dam. 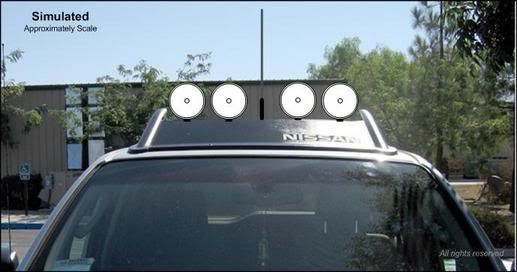 Here's a scale picture to estimate what the lights would look like at that height. I'll leave enough slack in the power wires so that they can rotate the 90 degrees each way. That center hole will be used for a universal antenna mounting allowing me to swap out antenna's as the spirit moves me to match my radio use. Normally I'll keep a tri-band 70 Cm, 1.25M, and 2M antenna in there but can go bigger or smaller as needed. I figure it's going to take a couple of hours worth of time to drill the holes, tap each end with a mounting bolt, and paint everything a flat black. Before I mount the thing to the truck I have an idea of putting a 1/4" wooden dowel in the retaining pin's place to see if it will function as a safety allowing the dowel to snap if the lights were to hit a low laying branch (we don't do trees in the desert). Any suggestions or feedback would be welcome ... before I get out the drill press and chop saws. Edited to add: These measurements are for the '05-06 model and I'm not sure that they'll work with the earlier generation. The concept ought to work with minor modifications.
|
|
Top
|
|
|
|
#291423 - 29/08/06 02:06 PM
 Re: Idea for a roof rack light bar
|
Anonymous
Unregistered
|
Very nice! Awesome design. I'm confused about a couple things: how the tube attached to the angle on the left? Is there a bolt missing from the picture? And I don't understand this part:
"The "L" bracket on the side is 10 inches long meaning it can hit both of the stock roof storages mounting bolts. I'll put a third one in there in the middle and come through with a nice machine bolt and a bottom backing plate a few inches long to spread the stress load out across the bottom. If I wanted to get lower I could as there is about 4" of dip down below the very front air dam on the '06 model but then the lights would point into the air dam."
Is the "L" bracket you speak of the one labeled "C"?
Anyway, it looks very good and I might have to use that design if I decide to get lights! It would definitely help on the highway to have them down to save gas, plus let you get into garages. Excellent!
|
|
Top
|
|
|
|
|
#291424 - 29/08/06 03:16 PM
Re: Idea for a roof rack light bar
|
Anonymous
Unregistered
|
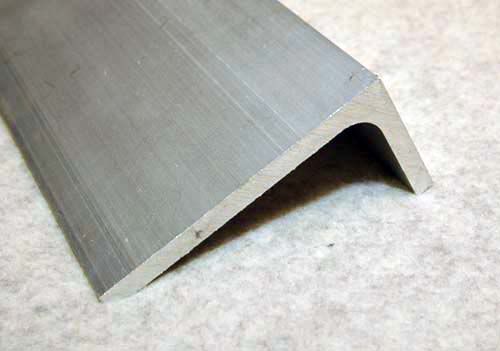
Yes, item C is an "L" bracket - alumimum channel 3.5" x 3.5" by 0.25" thick. This piece is 10 inchs long and runs lenght-wise down the lenght of the inside of the track where the normal roof rack storage would fit. There will be two holes to mount into the factory storage mounting holes which are 8" a part. Drilling a third hole 4" away from each factory hole will give me a third hole and allow me to put a backing plate on the bottom which will sandwich up. Let me do a quick drawing. 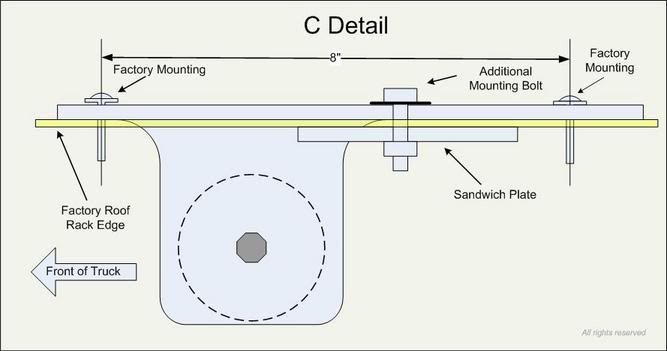 Here's looking sideways at the bracket - the yellow is the current stock mounting for the roof storage. The bracket runs 10" along it allowing three bolts to drop down into the roof rack mount. The third one is an "honest" one with a backing plate to spread the stress all along that plastic. Most of the "L" bracket's bottom is cut away leaving just enough for the "B" part to mount to it at a 90 degree angle. (I really wish I could do 3D CAD work!)
|
|
Top
|
|
|
|
|
#291425 - 29/08/06 08:45 PM
Re: Idea for a roof rack light bar
|
Anonymous
Unregistered
|
Ahh, I see...got it. Actually, I could model each part and create that assembly in 3-D SolidWorks in under an hour (I'm an ME and I do this every day...) but I'm not sure how much good that would do, other than provide cool pictures! Unless you wanted to send the drawings to a machine shop, but I doubt that would be cheaper than doing it yourself.
I will probably try this whenever I decide to get lights, it's a very good design. Definitely post pics when you're done!
|
|
Top
|
|
|
|
|
#291426 - 29/08/06 09:53 PM
Re: Idea for a roof rack light bar
|
Anonymous
Unregistered
|
Great idea. Please keep us posted. X2THA_T and I were talking about trying to come up with a solution like this after doing his body lift that put his lights about 1/2" from hitting when he pulls into his garage. Your mount sounds like just the ticket! Nice work! ![[ThumbsUp]](graemlins/thumbsup.gif)
|
|
Top
|
|
|
|
|
#291427 - 30/08/06 03:02 PM
Re: Idea for a roof rack light bar
|
Anonymous
Unregistered
|
OK refresh your browsers if you want to see a minor change. I made the main cross bar thinner by half and lowered the diameter by 0.25 of an inch. Looking at some 2.50" 0.25" wall tubing the stuff just struck me as too much - the thing would function as a roof slider if needed! Dropping down to the next thinner size tube wall of 0.125" seems like it will work. I'll order parts up this week from my metal supplier and give the thing a go. The extra 0.25" lower on the lights helps too. Edited to add: aluminum bill is now down to $56 vice $90 something. Here's the actual spacing I'm going with on the mounting holes. I wanted to leave a bit of a gap in the middle for an antenna. I know that the lights being that close to the antenna I'll get a pretty good coupling at the higher frequencies but not too bad at the lower ones like 1.25, 2, and 6 meter bands. 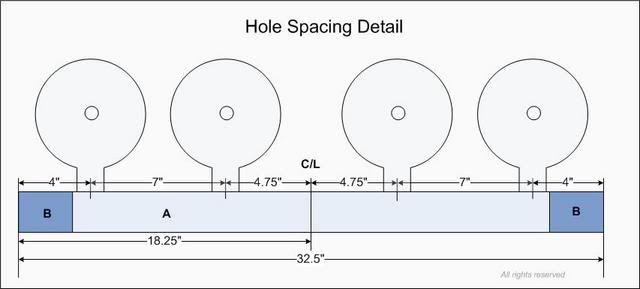
|
|
Top
|
|
|
|
|
#291428 - 31/08/06 08:37 AM
Re: Idea for a roof rack light bar
|
Anonymous
Unregistered
|
Well, I just ordered 4 ProComp 55w lights, 2 spot + 2 flood, and rocker switches from 4x4mods.com, so I'm going to be making this next week as well. I'm going to see if I can use scrap metal that I have at my company's lab, otherwise I'll order it (probably from McMaster, it's the quickest). I'm going to skip the paint and just bead blast the parts. Thanks for the design, man! I'll let you know how I do with mine.
|
|
Top
|
|
|
|
|
#291429 - 31/08/06 12:43 PM
Re: Idea for a roof rack light bar
|
Anonymous
Unregistered
|
The hard part will be finding an inside diameter tube to match an outside diameter rod. I've got the parts on order but they'll likely not arrive until next week sometime. I went with two sets of lights too but might put a set on the bumper and a set on the roof ... don't think the stock alternator is good for 830 watts worth of lights to go with three sets.
I've always liked a set down low to make rocks and holes fill with shadow to see the contrast better. Heck I'll try both sets up and then one set down to see how they feel. I haven't yet figured out how I'm getting four wires up there though the roof.
|
|
Top
|
|
|
|
|
#291430 - 01/09/06 08:36 AM
Re: Idea for a roof rack light bar
|
Anonymous
Unregistered
|
I've ordered up the nuts and bolts last night. I'm going to use a pair of 5/16"-18 bolts which will be tapped 1.25" deep into each "B" axle. I figured if I went with just one bolt in the center the thing would want to rotate with the tube where two bolts in each end would hold everything in place. Looking at 3/8" bolts they look like they'd be just a bit too big for the 2" axle.
For the lights I bought some 4.25" long 1/2"-20 bolts as the stock KC bolts aren't going to be long enough to drop down thru the 2.25" tube. Matching plastic insert locking nuts will hold those bolts in place.
I went with grade 8 bolts as they weren't that more expensive than the lessor quality ones.
|
|
Top
|
|
|
|
|
#291431 - 01/09/06 02:23 PM
Re: Idea for a roof rack light bar
|
Anonymous
Unregistered
|
I made a 3-D model during my lunch break today to help me with making this thing. Check it out - it's a little different than yours and it doesn't have the third support on the top angles. It's to scale, but since I haven't actually gone outside and measured the mounting points and available space, it's not exact - I went by your dimensions. I also used 2.25"OD x 2"ID aluminum bar, with two short 3" rods on the ends, with two bolts each for attaching to the 3" x 2" angle. The 3" rods keep the large bar in place, while the pin holds it either up or down. I'll throw some o-rings between the long mounting bar and the side of the basket to keep it nice and tight. The hardest thing will be finding a pin that will hold still during off-road driving. Anyway, here it is...the first pic is how the assembly looks when up:  And then how it looks down:  And a wireframe view of the pin/rod connection that allows the rotation:  And how the assembly comes together:  You can get all the parts (36" tube, 3" rods, and 10" angles - all aluminum) cut to size at onlinemetals.com for a total of less than $50. I'm going to make sure my lights can mount to a round bar, and if so, I'll start ordering!
|
|
Top
|
|
|
|
|
#291432 - 01/09/06 03:05 PM
Re: Idea for a roof rack light bar
|
Anonymous
Unregistered
|
Excellent work !!!
I use onlinemetals for all my fabrication needs. I've built a couple of ham radio antennas for fun. Home Depot sells pins with spring-loaded detents in 1/4" x 2" long ... I don't remember if they carry larger ones. I'm thinking bolts with wing nuts if they don't have them.
That's exactly what I had planned with part "B" - the axle parts. "O" rings would be a nice addition.
I'm a weekend off-roader and probably will flip the lights down 25 days out of 30.
Damn nice job.
|
|
Top
|
|
|
|
|
#291433 - 06/09/06 05:23 PM
Re: Idea for a roof rack light bar
|
Anonymous
Unregistered
|
I've ordered "Heavy Duty Spring-Loaded Quick-Release Pin 3/8" Diameter, 2-1/2" Usable Length" from McMaster-Carr hardware to try as the holding pins. Looking at 1/2" pins they seemed really big for the application so I'm dropping down to the 3/8ths which still has thousands of pounds of sheer strenght.
|
|
Top
|
|
|
|
|
#291434 - 06/09/06 11:54 PM
Re: Idea for a roof rack light bar
|
Anonymous
Unregistered
|
so who is going to start mass producing these and how much??? 
|
|
Top
|
|
|
|
|
#291435 - 07/09/06 09:44 AM
Re: Idea for a roof rack light bar
|
Anonymous
Unregistered
|
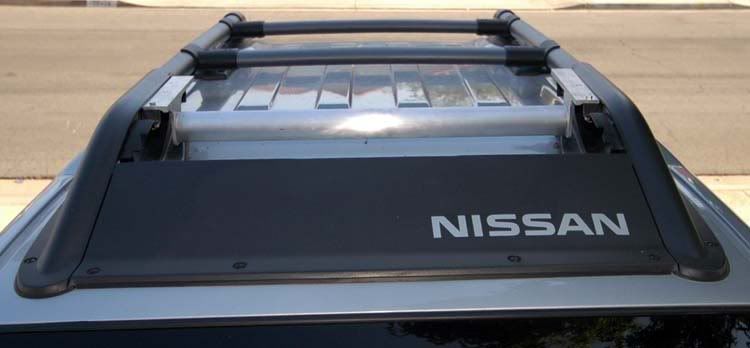
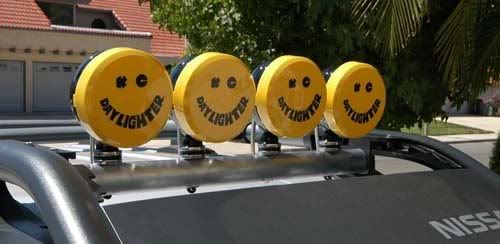
Ordered my aluminum today from onlinemetals. Should be here Tuesday, hopefully I can get everything done by the weekend of the 15th when I have a big wheeling trip with a night run! I measured the factory mounting points to be 8" apart, and 31" from one side to the other. This, along with the available aluminum stock sizes and type of load we're looking at, dictated the design. I then maximixed the distance between lights (came to 7.25", so this is good for a 6" light) while allowing access to the retaining pin. For the pin, I'm going with McMaster part no. 95255A275, it's 1/4" with a 2.3" usable length, a perfect fit for the 2.25" tube! I finalized it today during lunch, ended up ordering a 29" round tube cut to size for the actual mounting bar. I'm going to machine all the holes in the round bars/tube, and then I'll be match-drilling the mounting holes on the angles that will attach it to the factory rack, based on how everything fits. Here's what it looks like: 
|
|
Top
|
|
|
|
|
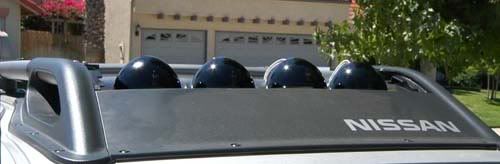
#291436 - 07/09/06 09:55 PM
Re: Idea for a roof rack light bar
|
Anonymous
Unregistered
|
|
|
Top
|
|
|
|
|
#291437 - 07/09/06 10:00 PM
Re: Idea for a roof rack light bar
|
Anonymous
Unregistered
|
Since the weather is going to be great tomorrow me and the better half are going camping for the first time with the Xterra. The metal shop will sit idle.
The dog came up sick so camping is off and work is back on.
|
|
Top
|
|
|
|
|
#291438 - 08/09/06 03:25 PM
Re: Idea for a roof rack light bar
|
Anonymous
Unregistered
|
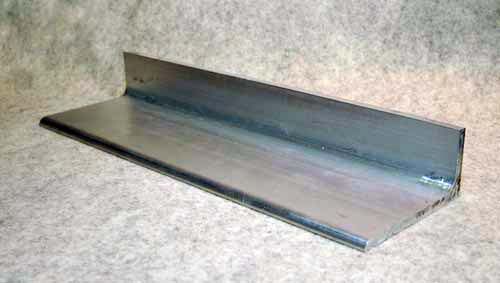
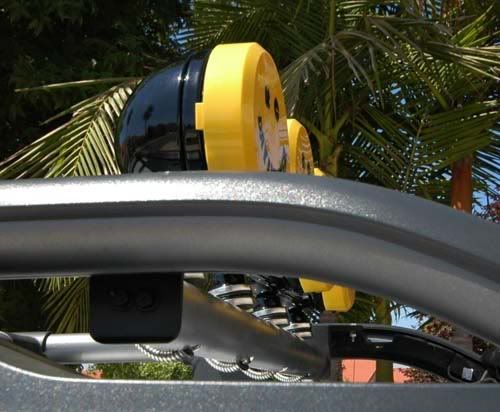
A bit more work. I'm an electrician ... not a machinist. :p I've got both brackets ready and drilled matching holes though both. 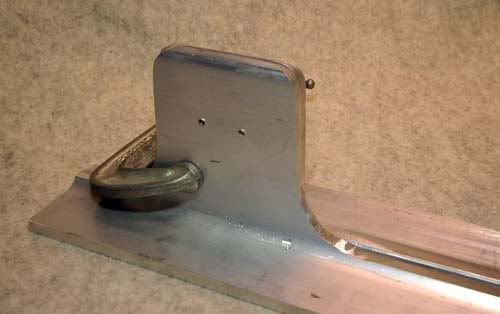 I then drilled and tapped the 2" rods spending a lot of time making sure that they were matched so that the hinge wouldn't bind when mounted on the roof. At this point I'm still assuming that the rails on the roof are parallel. 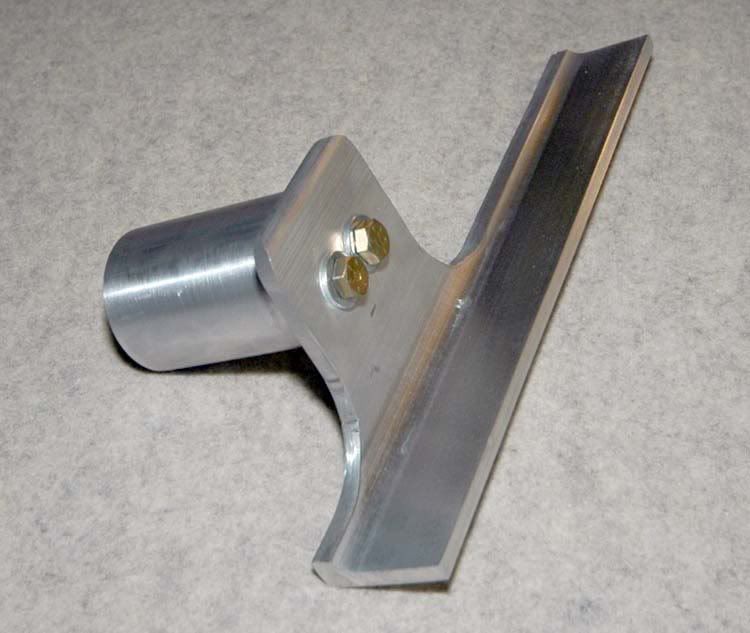 These things are so tight that a bit of machine oil helps a whole lot moving them in and out. 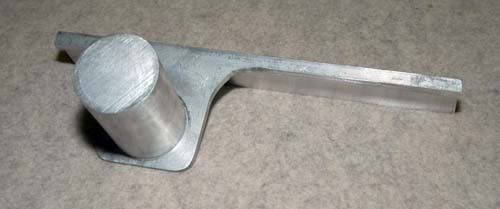 Next I have to put the brackets up on the roof, drill holes, run screws and then measure between the bracket so that I can cut the tube to width. 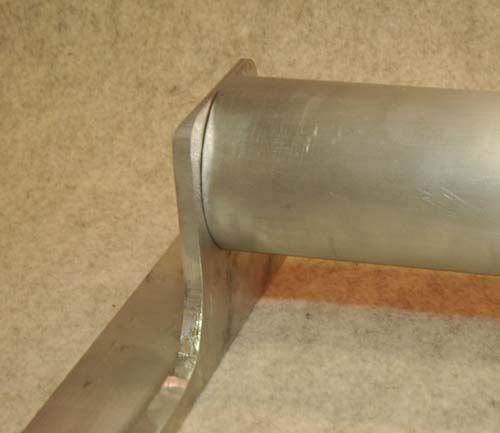
|
|
Top
|
|
|
|
|
#291440 - 08/09/06 10:04 PM
Re: Idea for a roof rack light bar
|
Anonymous
Unregistered
|
That is beautiful! Will you be able to fit a short fairing in between the roof flush fairing and the light bar?
|
|
Top
|
|
|
|
|
#291441 - 08/09/06 10:52 PM
Re: Idea for a roof rack light bar
|
Anonymous
Unregistered
|
Sweet! How long did the crossbar end up being? Mine is being cut to 29" which I think will be OK. I don't have a saw (go figure...I have access to a lathe and mill, but no saw) so I tried to buy it cut to the right size. It looks like it will be OK. If anything, the angles will be wider (I'll cut less off the 2" side) to make it fit. I don't think that will matter, I ordered 1/4" angle which is super beefy for this application. Dude that looks awesome! I can't wait to get mine on!
|
|
Top
|
|
|
|
|
#291442 - 09/09/06 07:09 AM
Re: Idea for a roof rack light bar
|
Anonymous
Unregistered
|
Originally posted by chrishaynesusa:
That is beautiful! Will you be able to fit a short fairing in between the roof flush fairing and the light bar? Yes that was part of the plan but I didn't know exactly where I was going to put the bar so I didn't know the size of the fairing. I'll get a bit of aluminum and paint it to match as much as possible the stock wind damm.
|
|
Top
|
|
|
|
|
#291443 - 09/09/06 07:15 AM
Re: Idea for a roof rack light bar
|
Anonymous
Unregistered
|
Originally posted by armandov99:
Sweet! How long did the crossbar end up being? Mine is being cut to 29" which I think will be OK. I don't have a saw (go figure...I have access to a lathe and mill, but no saw) so I tried to buy it cut to the right size. It looks like it will be OK. If anything, the angles will be wider (I'll cut less off the 2" side) to make it fit. I don't think that will matter, I ordered 1/4" angle which is super beefy for this application. Dude that looks awesome! I can't wait to get mine on! 28 and 7/8th inches so you're going to be close at 29 inches. I shaved a tiny bit more off of my measurement to allow a bit of expanasion. I've got the 1/2" holes drilled in the top - there's not going to be room for my antenna. I might add a thick bar back behind the lights for the antenna. If I had gone with 2" rods that extra 2" would have been enough for the antenna. My current challenge is getting the bolts up from below for the KC's - looking at popping a 1" hole up from below. My only concern is that when they're tipped over the 1" hole will whisle with the wind. :p I've found some one inch gaskets at Home Depot but none with a 1/4" thickness ... the Internet is my friend. My wire and connectors won't arrive until Monday.
|
|
Top
|
|
|
|
|
#291444 - 09/09/06 12:08 PM
Re: Idea for a roof rack light bar
|
Anonymous
Unregistered
|
|
|
Top
|
|
|
|
|
#291445 - 09/09/06 02:31 PM
Re: Idea for a roof rack light bar
|
Anonymous
Unregistered
|
Dude that looks awesome! I can't wait to get mine done. I can't believe that my 29" estimate was that close, considering I didn't even remove the basket before ordering the metal cut! My aluminum comes in Tuesday, then I'll be ordering fasteners and cable conduit that should be here the following day.
Very nice job, man. I'll put up pics of mine when it's done!
|
|
Top
|
|
|
|
|
#291447 - 13/09/06 05:58 PM
Re: Idea for a roof rack light bar
|
Anonymous
Unregistered
|
 Gaskets for the wires, flat 1" plugs for the round 1" holes, pimped-out metalic flake paint for the bar, and the bottom steel gasket removed from the bottom of the KC HiLiTES means a better more firm fit to the round bar. The wire kit arrived yesterday ... looking for places to mount the relays and fuse box ... there's not a whole lot of room under the hood.
|
|
Top
|
|
|
|
|
#291448 - 13/09/06 06:52 PM
Re: Idea for a roof rack light bar
|
Anonymous
Unregistered
|
Brilliant!
|
|
Top
|
|
|
|
|
#291449 - 13/09/06 07:47 PM
Re: Idea for a roof rack light bar
|
Anonymous
Unregistered
|
Paul, sending you a PM about the relay/fuse box mounting situation.
|
|
Top
|
|
|
|
|
#291450 - 14/09/06 11:55 AM
Re: Idea for a roof rack light bar
|
Anonymous
Unregistered
|
Originally posted by Bobby B.:
Paul, sending you a PM about the relay/fuse box mounting situation. Thanks for the help. The '06 looks different in that area and that mounting spot on the firewall is blocked now. The battery is pretty close to a pair of factory fuse boxes. There's a bit of room between the battery and the nearest fuse box for a master 60A fuse but access is going to be difficult. I'm looking at mounting a plate to the mounting bolt for the factory fuse box to mount mine sort of facing the motor. I might find room under the passenger's seat for a plate with the fuse box and lighting relays if there's room near the amplifier. Might look under the passenger's side kick panel. I like having access to the fuses without breaking a sweat - the relays can get buried. It's going to be a long weekend between finishing off the lighting and starting in on the alarm system.
|
|
Top
|
|
|
|
|
#291451 - 14/09/06 12:21 PM
Re: Idea for a roof rack light bar
|
Anonymous
Unregistered
|
Looks sweet man! Alot smoother looking than my black spray painted PVC tubing!! It gets the job done though....you might have a marketing bar on your hands!!!
|
|
Top
|
|
|
|
|
#291452 - 14/09/06 12:59 PM
Re: Idea for a roof rack light bar
|
Anonymous
Unregistered
|
absolutely disgusting Very well done
|
|
Top
|
|
|
|
|
#291453 - 14/09/06 07:30 PM
Re: Idea for a roof rack light bar
|
Anonymous
Unregistered
|
OK. Mechanical done ... save the all important hole in the roof. So electrical started tonight as its pretty cool here tonight. I'm a retired US Navy Master Chief Electrician's Mate so I know a bit about 'trons. I need to run a battery fuse box up under the dash for these two sets of lights, a ham radio, and possibly some more junk. The poor alternator can't put out more than about 90 amps so I figure I can't steal any more than about 70 of them and still keep the SUV actually running. 70 amps means 8 gauge wire to the fuse box so I used one of the two mounting posts on the battery positive side and ran 8 gauge cable first to a 60 amp fuse and then along the top of the firewall to an empty grommet hole behind the power steering pump area. 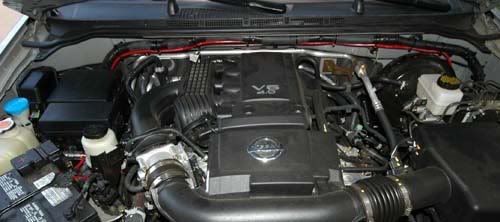 Here's the details on the battery area. I drilled and mounted the 60 amp master fuse to the plastic post that holds one of the two under hood fuse boxes. You want to make these connections very tight as there is a bunch of power flowing through them. Loose connections heat up ... and melt stuff. The battery post had a bit of factory locktite so I put some on after tightening down the connections there. 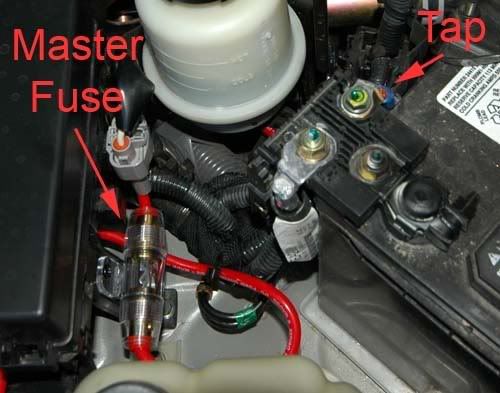 The grommet side. Put a bit of a drip loop here so that if water follows the wire it doesn't come up against the grommet. (The port side is the driver's side for you land lubbers)  Now to the inside where I mounted the fuse box. I used a gold plated (pimping ain't easy) four fuse box. I'll use 25 amp fuses for the 300 watt (22 amps) and the 260 watt (20 amp) light sets. I put a couple of small screws into the metal here, you don't want anything near your feet sliding around. The four fuses have their outputs running downwards toward the kick panel. I'll mount the lighting relays just above the fuse panel as I'll typically never have to get to them again. 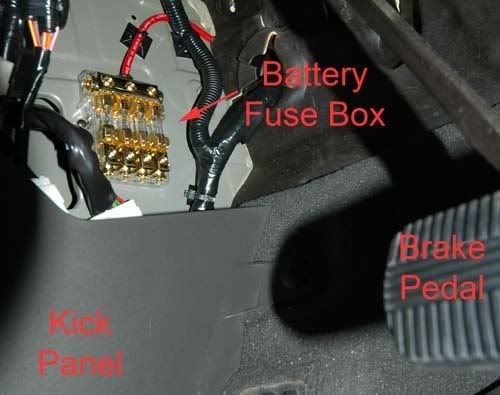 The KC's come with some fairly nice under dash switches but I wanted something a bit better so I ordered up some custom switches from 4x4mods.com for $10 each. To mount them you have to pull the panel out from under the steering wheel. Simple enough - pull out one screw that is visible near the code reader on the starboard side. Then pull the weather stripping out a bit, tug on the trim piece just along side the dash to expose one hidden screw under it (see arrows below). Anybody know what the plug just under the letter "M" in mirror is for? The mirror plug was firmly attached but this second plug was just rattling around loose. :rolleyes: 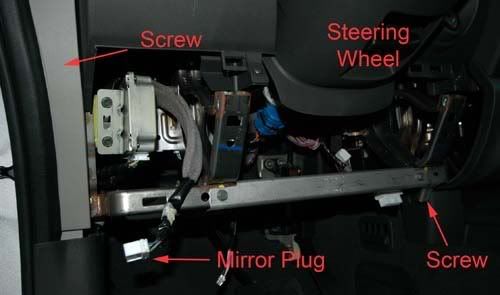 The plugs come out by lifting four clips with the blade of a knife or flat blade screw driver. 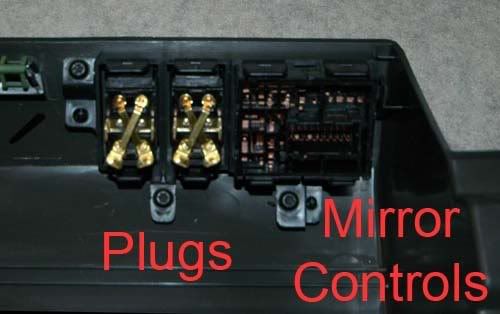 The switches just slide in as perfectly as you could ever want. They're nice and beefy and give a really good postive click. There are LEDs inside to indicate when the lights are on. 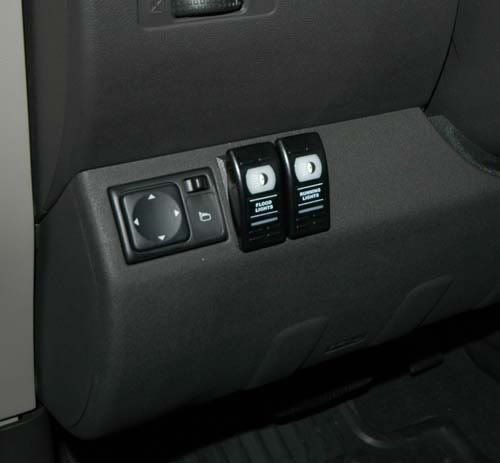 It got dark, I got tired and quit for tonight. Next I'll run the 12 gauge (rated for 40 amps) cables along the driver's side kick panel, along the door sill and then up the "B" pillar to the roof line for the ever exciting hole in the roof posting.
|
|
Top
|
|
|
|
|
#291454 - 14/09/06 08:32 PM
Re: Idea for a roof rack light bar
|
Anonymous
Unregistered
|
Those are some very impressive how-tos. Great set-up guys! I might have to steal your ideas.
Thank you so much!
|
|
Top
|
|
|
|
|
#291455 - 14/09/06 08:36 PM
Re: Idea for a roof rack light bar
|
Anonymous
Unregistered
|
Originally posted by Syndicate:
Those are some very impressive how-tos. Great set-up guys! I might have to steal your ideas.
Thank you so much! That's what I put them out here for ... we each build from each other's experiences. I'm not the most knowledgeable when it comes to tires, suspension, and drive train so I'll be stealing ideas from those RKIs.
|
|
Top
|
|
|
|
|
#291456 - 15/09/06 07:19 PM
Re: Idea for a roof rack light bar
|
Anonymous
Unregistered
|
Get ready ... 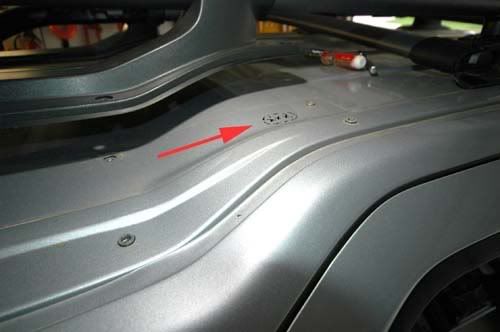 Come to find that my 25 foot lenght of 12 gauge wire is about three feet short as I really need two lenghts of about 14 feet and one shorter length of about five feet for the grounds in 8 gauge. Managed to put my ham radio in under the passenger's seat next to the Rockford Fosgate amplifier but that's another thread. 
|
|
Top
|
|
|
|
|
#291457 - 16/09/06 06:12 PM
Re: Idea for a roof rack light bar
|
Anonymous
Unregistered
|
Went to the Nissan new car clinic this morning and started drilling holes in the roof this afternoon. I measured twice and then a third time. They're under the gasket material of the roof rack and come up into the rack's frame in a void. 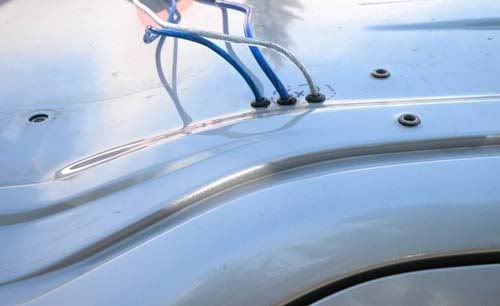 It doesn't rain here much but still I siliconed the holes inside and out. Silicone is cheap, water damage isn't! 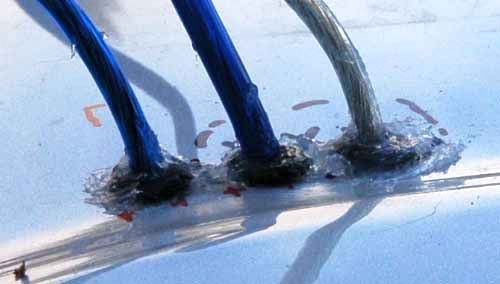 The wires make a 90 degree turn and then through three more holes. There's a 12 gauge wire for the driving lights, one for the pencil beams, and an 8 gauage ground wire that drops down to a heavy mounting bolt at the base of the "B" pillar. 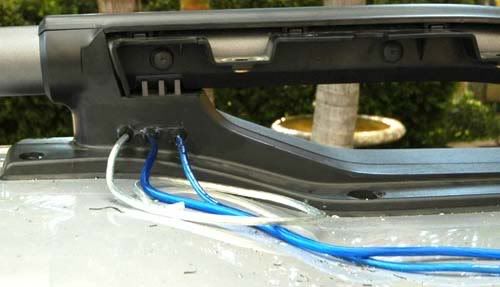 I'm waiting on the quick release plugs that I ordered earlier this week. They're called PowerPoles and are good for 45 amps each. Finally one last picture with the most recent bush fire's smoke in the background. While I was working it was snowing ash on me. I fired up the light toggle switches and they look pretty nice. 
|
|
Top
|
|
|
|
|
#291459 - 17/09/06 07:56 AM
Re: Idea for a roof rack light bar
|
Anonymous
Unregistered
|
That looks awesome.
You might like to relabel your "powersteering pump" to "brake booster" though.
Good job and well thought out.
|
|
Top
|
|
|
|
|
#291460 - 17/09/06 11:25 AM
Re: Idea for a roof rack light bar
|
Anonymous
Unregistered
|
which ham radio are you running... almost looks like my Kenwood TMV7A... which I thoroughly enjoy... and the remote mount is just icing on the cake.
shawn
|
|
Top
|
|
|
|
|
#291461 - 17/09/06 01:40 PM
Re: Idea for a roof rack light bar
|
Anonymous
Unregistered
|
You didn't have any trouble screwing the roof rack bolts back on? Unfortunately, I tried going that route but 2 of them would not go back in...I might have to take it in to the dealer and have them fix that, because it won't seal right if they don't go all the way in. This sucks. For now my wire is going in the door. I was hoping I wouldn't have that problem, I guess it's hit and miss because I know I'm not the only one.
|
|
Top
|
|
|
|
|
#291462 - 17/09/06 05:11 PM
Re: Idea for a roof rack light bar
|
Anonymous
Unregistered
|
Originally posted by k1w1t1m:
That looks awesome.
You might like to relabel your "powersteering pump" to "brake booster" though.
Good job and well thought out. Done ... told you I wasn't good with the moving parts :p
|
|
Top
|
|
|
|
|
#291463 - 17/09/06 05:14 PM
Re: Idea for a roof rack light bar
|
Anonymous
Unregistered
|
Originally posted by wxrman:
which ham radio are you running... almost looks like my Kenwood TMV7A... which I thoroughly enjoy... and the remote mount is just icing on the cake.
shawn That's a Yaesu 8800R with crossband repeat ability. I'm just a technician's class as I can't learn morse code to save my life. I passed the technical element for my general license over a year ago when the FCC was making noises like they were going to drop the code requirement like many other nations have. I've since learned that I can send code rather than receive it ... once I get to my doctor to document my military related hearing loss. I've got a couple of 2M/440 Mhz antennas coming ... but that's another post.
|
|
Top
|
|
|
|
|
#291464 - 17/09/06 05:18 PM
Re: Idea for a roof rack light bar
|
Anonymous
Unregistered
|
Originally posted by armandov99:
You didn't have any trouble screwing the roof rack bolts back on? No they all went back in twice without an issue. The factory uses a blue locktite material to seal them in there. What I did do is squirt a dab of silicone into each hole to seal it up and to lubicate the screw. They went in nice and easy actually. The way they're tack welded from below it looks like they're designed to have the screws removed. I have heard others chat here about snapping off the nuts so I was double careful. My plans call for the other side to come off to run the ham radio antenna up the other side.
|
|
Top
|
|
|
|
|
#291465 - 17/09/06 06:05 PM
Re: Idea for a roof rack light bar
|
Anonymous
Unregistered
|
Mine definitely don't look like they are tack welded underneath. They seem to be some type of captive fastener. There is not a single weld on them. Maybe they realized the problem sometime through production and decided to start tack welding.
|
|
Top
|
|
|
|
|
#291466 - 17/09/06 07:29 PM
Re: Idea for a roof rack light bar
|
Anonymous
Unregistered
|
Originally posted by armandov99:
Mine definitely don't look like they are tack welded underneath. They seem to be some type of captive fastener. There is not a single weld on them. Maybe they realized the problem sometime through production and decided to start tack welding. I'm only guessing on the weld as they were blind to me but I didn't see anything gripping the top and pushing up from the bottom. It was a tight fit between the headliner and the roof. I slid a piece of scrap metal up in there to prevent the drill bits from going right though the fabric. My hand was just barely able to squeeze inside and push the wires up though the holes from the bottom.
|
|
Top
|
|
|
|
|
#291467 - 19/09/06 06:37 PM
Re: Idea for a roof rack light bar
|

Member
Registered: 02/04/03
Posts: 49
Loc: Living in So Cal, moving to VA...
|
Could they be rivnuts? Rivnuts
_________________________
"Lotsa cream, lotsa sugar" -- Winston Wolf
|
|
Top
|
|
|
|
|
#291468 - 21/09/06 06:34 PM
Re: Idea for a roof rack light bar
|
Anonymous
Unregistered
|
WOW...........thats all I can say!!!!!
|
|
Top
|
|
|
|
|
#291469 - 22/09/06 12:24 PM
Re: Idea for a roof rack light bar
|
Anonymous
Unregistered
|
Originally posted by doxman: Could they be rivnuts?
Rivnuts Looks like that or something very similar. They are finely threaded screws and the torque used to install them was crazy, they were tough to get off. I think the nuts don't have enough strength to stay captive with that amount, which is why they are shearing off. Stupid Nissan.
|
|
Top
|
|
|
|
|
#291470 - 28/10/06 02:18 PM
Re: Idea for a roof rack light bar
|
Anonymous
Unregistered
|
Here's a close up of the keeper pins: 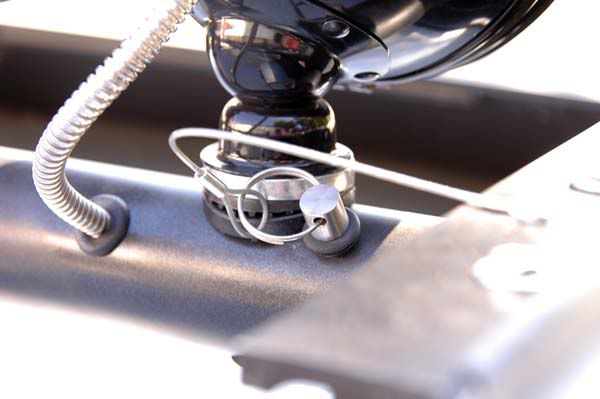 And the back giving the overall effect: 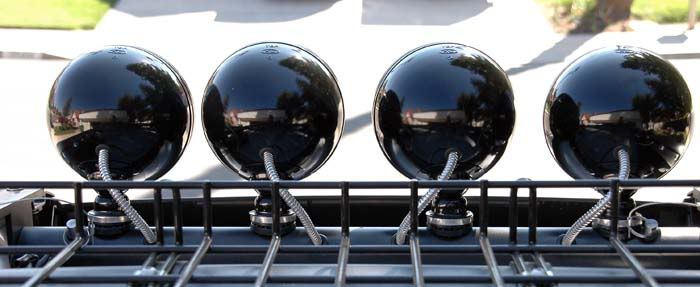
|
|
Top
|
|
|
|
|
#291471 - 29/10/06 12:59 PM
Re: Idea for a roof rack light bar
|
Anonymous
Unregistered
|
Originally posted by armandov99: I made a 3-D model during my lunch break today to help me with making this thing. Check it out - it's a little different than yours and it doesn't have the third support on the top angles. It's to scale, but since I haven't actually gone outside and measured the mounting points and available space, it's not exact - I went by your dimensions.
I also used 2.25"OD x 2"ID aluminum bar, with two short 3" rods on the ends, with two bolts each for attaching to the 3" x 2" angle. The 3" rods keep the large bar in place, while the pin holds it either up or down. I'll throw some o-rings between the long mounting bar and the side of the basket to keep it nice and tight.
The hardest thing will be finding a pin that will hold still during off-road driving.
Anyway, here it is...the first pic is how the assembly looks when up:
And then how it looks down:
And a wireframe view of the pin/rod connection that allows the rotation:
And how the assembly comes together:
You can get all the parts (36" tube, 3" rods, and 10" angles - all aluminum) cut to size at onlinemetals.com for a total of less than $50.
I'm going to make sure my lights can mount to a round bar, and if so, I'll start ordering!looks like you modeled this up in solidworks... could you post the model files on here???
|
|
Top
|
|
|
|
|
#291472 - 01/11/06 10:02 AM
Re: Idea for a roof rack light bar
|
Anonymous
Unregistered
|
Hey good catch. PM me your e-mail and I can send you the files. They're rough but easy to edit and make drawings for if you wanna take 'em to a shop.
|
|
Top
|
|
|
|
|
#291473 - 04/11/06 01:47 PM
Re: Idea for a roof rack light bar
|
Anonymous
Unregistered
|
Hey, Paul. your switches are awesome...just from an electrical newbie though, how did you wire from the interior fuse block to the switches and do you have any pics? thanks.
|
|
Top
|
|
|
|
|
#291474 - 05/11/06 11:15 AM
Re: Idea for a roof rack light bar
|
Anonymous
Unregistered
|
Originally posted by Parker Woodruff:
Hey, Paul. your switches are awesome...just from an electrical newbie though, how did you wire from the interior fuse block to the switches and do you have any pics? thanks. I ran a heavy 8 guage cable from the battery to a fuse and then to a fuse box that I mounted up above the driver's left leg in the area where the stock satellite receiver would have been mounted. That's the power source for a pair of relays. From the ignition controlled cigerette lighter I ran a wire to each of the two switches. They feed a +12VDC control signal to each of the relays. When the ignition is on +12VDC lights the switch. When the switch is turn on that voltage runs to the relay causing it to operate and closing the armature which connects the battery power up to the lights. 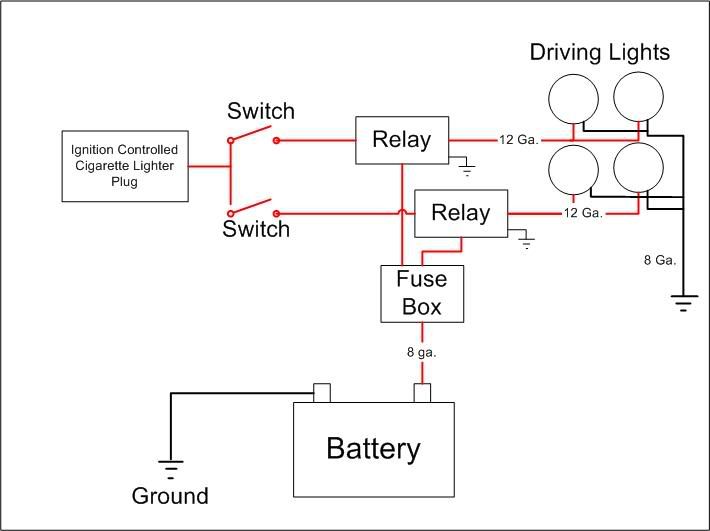
|
|
Top
|
|
|
|
|
#291475 - 06/11/06 09:58 AM
Re: Idea for a roof rack light bar
|
Anonymous
Unregistered
|
are the relays required and what is their function?
|
|
Top
|
|
|
|
|
#291476 - 06/11/06 12:00 PM
Re: Idea for a roof rack light bar
|
Anonymous
Unregistered
|
Yes you need relays, it performs the function of a switch without the actual switch having to carry the entire current going to the lights. So the switch only has a low 12V current that triggers the relay, and the relay is what actually switches the high-current line going to the lights.
Without relays, you'd be running way too much current through the switches.
|
|
Top
|
|
|
|
|
#291477 - 06/11/06 05:24 PM
Re: Idea for a roof rack light bar
|
Anonymous
Unregistered
|
Ok, this is making a little more sense. So if I were doing the setup you have, then I'd have about 18 guage wire going b/t the switch and relays. Then once the switch is turned on, the relays would activate charge coming from the battery.
But I assume I wouldn't need a relay if I was just putting something small in, like if I wanted a switch to control a small interior light or something like that. Is that correct?
thanks for your help.
|
|
Top
|
|
|
|
|
#291478 - 06/11/06 06:17 PM
Re: Idea for a roof rack light bar
|
Anonymous
Unregistered
|
Originally posted by Parker Woodruff:
Ok, this is making a little more sense. So if I were doing the setup you have, then I'd have about 18 guage wire going b/t the switch and relays. Then once the switch is turned on, the relays would activate charge coming from the battery.
But I assume I wouldn't need a relay if I was just putting something small in, like if I wanted a switch to control a small interior light or something like that. Is that correct?
thanks for your help. The switches are rated for a bunch of power but I'm just not comfortable with using them with that much power. The heavy gauge wires run to the relay and then up to the lights - the wire from the switch to the light relay is light gauge. They make a whole lot of sense with bumper mounted lights where running heavy gauge wire into the cab is saved. The measure of load also known as electral power or "work" performed by a device is watts. You want to match the wattage of the wires, and switches to be greater than the load. The fuse should be just slightly more than the current requirement. With small 55 watt lights you can get by with a good toggle switch ... with 300 watts worth of light up your life pencil beams you can't. Current in amps times voltage in volts is equal to watts.
|
|
Top
|
|
|
|
|
#291479 - 07/11/06 08:02 AM
Re: Idea for a roof rack light bar
|
Anonymous
Unregistered
|
so would you be interesting in making one of these for me with 4 cheap-o lights? if so, how much would you charge?
|
|
Top
|
|
|
|
|
#291480 - 07/11/06 01:35 PM
Re: Idea for a roof rack light bar
|
Anonymous
Unregistered
|
Originally posted by tigergibb:
so would you be interesting in making one of these for me with 4 cheap-o lights? if so, how much would you charge? same here!
|
|
Top
|
|
|
|
#291481 - 08/11/06 07:17 PM
 Re: Idea for a roof rack light bar
|
Anonymous
Unregistered
|
Not me. Too much like work.
|
|
Top
|
|
|
|
|


 Previous Topic
 Index
Index